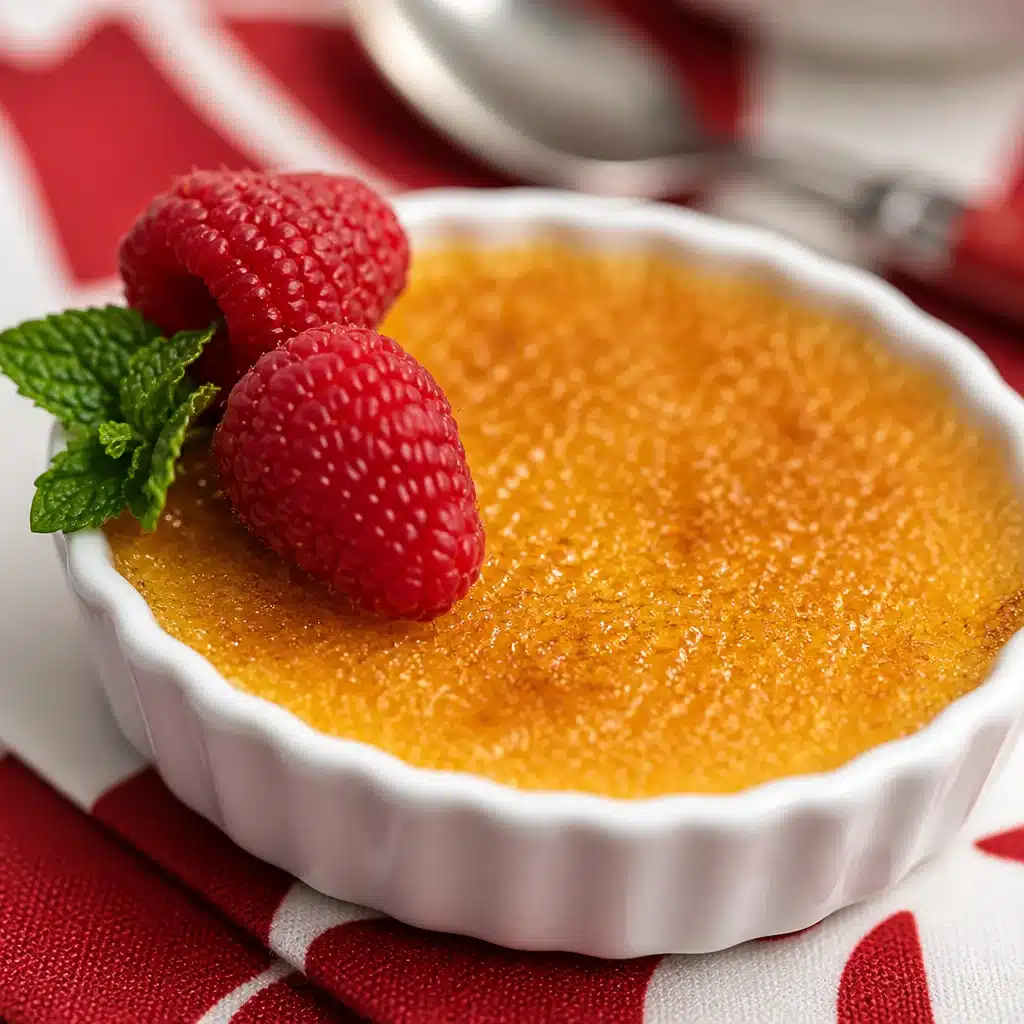
Creme Brulee Classic is one of those desserts that sounds fancy enough to order at a white tablecloth restaurant, but honestly, it solves a very real home problem. You want something impressive, you do not want a million steps, and you definitely do not want a sink full of dishes. I have been there, staring into the fridge hoping a magical dessert appears. This one actually feels calm to make, and the payoff is huge when you crack that sugar top. If you have ever worried it is too “chef-y” for you, I promise it is not. 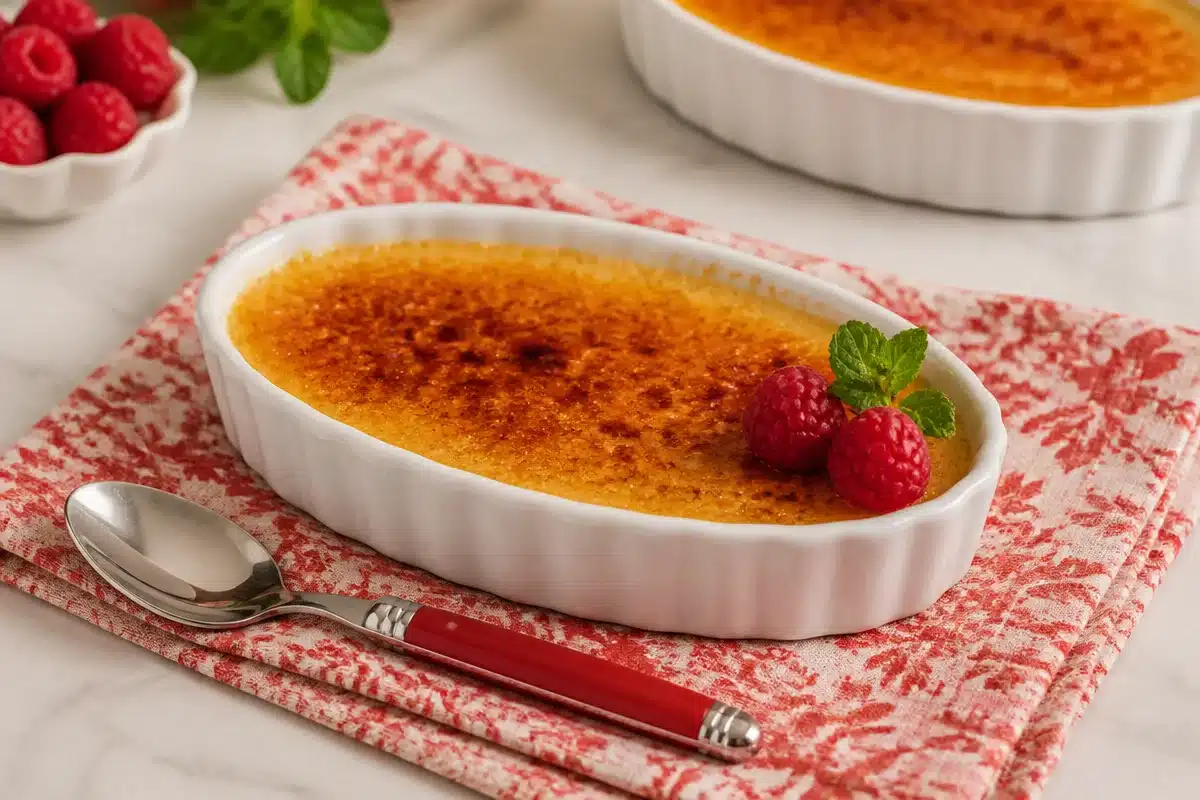
Key Benefits of the Topic
The biggest win with Creme Brulee Classic is that it is simple but looks like you really went all out. I love desserts that give you that “wow” moment without a ton of decorating skills.
Here is why I keep coming back to it:
- Make ahead friendly: you can chill the custards hours ahead, then torch the tops right before serving.
- Small ingredient list: cream, egg yolks, sugar, vanilla, and a pinch of salt. That is basically it.
- Perfect for guests: everyone gets their own little dish, which feels special.
- That crackly top: the caramelized sugar layer is half the reason people love it.
Also, if you are a dessert person who likes creamy things, this is the comfort zone. It is rich, smooth, and not overly sweet when you balance it right. I even like serving it after a cozy dinner like potatoes and roast chicken, and if you need a side dish idea, my comfort food heart always leans toward classic au gratin potatoes on the savory side of the table.
Common Misconceptions
I used to think Creme Brulee Classic was only for people with fancy kitchen tools and tons of patience. Nope. Let me clear up a few common myths I hear all the time.
You need a culinary torch or it will not work
A torch is the easiest way, but not the only way. You can caramelize sugar under a broiler if you pay close attention. The torch just gives you more control.
Custard is fragile and will definitely curdle
Custard can be easy if you go slow with heat and do not rush. Most “curdled custard” issues come from baking too hot or pouring hot cream too fast into yolks. You can absolutely avoid it.
It is basically the same as pudding
It is similar in spirit, but baked custard has a cleaner, silkier set when you do it right. Plus pudding does not give you that signature caramel crack.
“I always thought crème brûlée was too hard, but this method made it doable. The sugar top actually cracked like in restaurants, and my family went quiet for a full minute because they were too busy eating.”
Step-by-Step Guide
Okay, here is how I make Creme Brulee Classic at home in a way that feels straightforward. I am going to keep it simple and practical, like I would explain it to a friend who texted me from the grocery store.
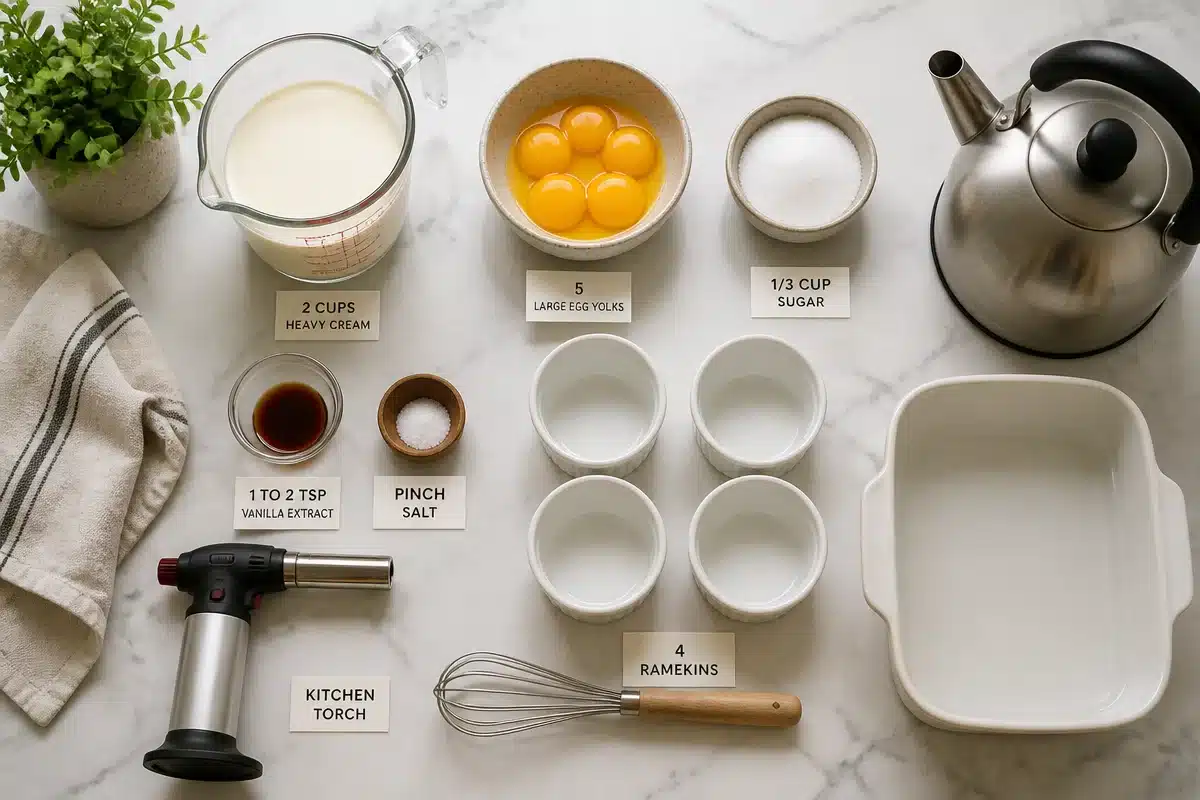
Ingredients and what you will need
- 2 cups heavy cream
- 5 large egg yolks
- 1/3 cup sugar (plus extra for the tops)
- 1 to 2 teaspoons vanilla extract or vanilla bean paste
- Pinch of salt
- 4 ramekins (or small oven safe dishes)
- Deep baking dish for a water bath
- Kettle or saucepan of hot water
- Kitchen torch or broiler
Quick oven note: I usually bake at 325°F. This is a gentle temp that helps the custard set without turning grainy.
Step 1: Warm the cream
Pour the cream into a saucepan and warm it over medium heat until it is hot and steamy, but not boiling. If it starts bubbling hard, pull it back. You want hot cream, not a rolling boil.
Step 2: Whisk yolks and sugar
In a bowl, whisk egg yolks with sugar and salt until it looks smoother and a bit lighter. You do not need to whip air into it, just mix well.
Step 3: Combine slowly
This is where people mess up, so do it slowly. While whisking the yolk mixture, drizzle in a little hot cream at a time. Once it is warmed up, you can pour the rest in more steadily. Stir in vanilla.
Step 4: Strain if you want extra smooth
Not required, but I like to strain through a fine mesh sieve into a measuring cup. It catches any bits and makes the texture feel extra polished.
Step 5: Fill ramekins and bake in a water bath
Place ramekins in a deep baking dish. Pour the custard into the ramekins. Then carefully pour hot water into the baking dish until it comes about halfway up the sides of the ramekins. The water bath sounds fussy, but it is the reason the custard cooks gently.
Step 6: Bake until just set
Bake around 30 to 40 minutes. Start checking at 30. The edges should look set, but the center should still have a little wobble, like soft Jell O. If it looks sloshy, give it a few more minutes.
Step 7: Cool, then chill
Carefully remove ramekins from the water bath and let them cool on the counter. Then cover and chill at least 4 hours. Overnight is even better if you are planning ahead.
Step 8: Sugar top and caramelize
Right before serving, sprinkle a thin, even layer of sugar over each custard. Torch it until it melts and turns deep golden. Let it sit for 1 to 2 minutes so the top hardens.
That is it. Once you do it once, it stops feeling mysterious. And if you are the kind of person who loves that crème brûlée vibe but also enjoys cheesecake, you might also want to peek at this creme brulee cheesecake because it scratches the same “creamy plus crunchy top” itch.
Tips for Success
These are the little things I wish someone had told me the first time I made Creme Brulee Classic. None of them are hard, but they make a big difference.
Keep the heat gentle: Do not boil the cream. Do not bake at a high temperature. Gentle is your friend.
Go for an even sugar layer: Too thick and it burns before it melts smoothly. Too thin and it melts into the custard. I like about 1 to 1.5 teaspoons sugar per ramekin, but it depends on the size.
Use the wobble test: When you shake the pan carefully, the centers should jiggle a little, not ripple like liquid.
Chill fully before torching: Cold custard means you can caramelize the top without warming the custard underneath.
If using a broiler: Chill the ramekins well, sprinkle sugar, then broil very close to the heat for a short time. Do not walk away. It can go from golden to burnt fast.
Resources and Tools to Enhance Your Experience
You do not need a chef kitchen, but a couple of tools make Creme Brulee Classic feel easy and repeatable.
Kitchen torch: The easiest way to get that clean crackly sugar top. A small butane torch made for cooking is perfect.
Ramekins: They help everything bake evenly and they look cute on the table. If you do not have them, small oven safe bowls work.
Fine mesh strainer: Optional, but it gives you that extra smooth texture.
Instant read thermometer: Not required, but if you like confidence, you can pull the custards when they are roughly in the 170 to 175°F range in the center. If you do not have one, the wobble test works great.
Deep baking dish: Anything that holds the ramekins and water safely works. I have used a roasting pan and even a large casserole dish.
Common Questions
1) Why did my custard turn grainy?
Usually it baked too hot or too long. Next time, check earlier and pull it when it still has a small jiggle in the middle.
2) Can I make it the day before?
Yes, and it is honestly better. Make the custard, chill overnight, then add sugar and torch right before serving.
3) What sugar is best for the top?
Regular white sugar works great. Superfine sugar melts a little faster, but it is not necessary.
4) How do I store leftovers?
Cover and refrigerate. The sugar top will soften in the fridge, so if you want the crack again, add a fresh sprinkle of sugar and torch before eating.
5) Can I flavor it beyond vanilla?
Absolutely. A little espresso powder, citrus zest, or a tiny splash of liqueur can be really nice. Just keep additions light so the custard still sets properly.
A sweet finish you can actually pull off
If you have been putting Creme Brulee Classic on your “someday” list, this is your sign to try it. Once you nail the gentle bake and that quick sugar torch, it becomes a dessert you can make on autopilot for birthdays, date nights, or random Tuesdays. If you want extra inspiration, I also like comparing methods with recipes like Classic Crème Brûlée (versatile and easy) – The Flavor Bender and Classic Crème Brûlée – Restaurant Worthy!. Now go clear a little space in your fridge for those ramekins, and enjoy that first spoonful right after the crack. You earned it.
Print
Creme Brulee Classic
- Total Time: 55 minutes
- Yield: 4 servings
- Diet: Vegetarian
Description
A simple yet impressive dessert with a rich custard base topped with a crackly caramelized sugar layer.
Ingredients
- 2 cups heavy cream
- 5 large egg yolks
- 1/3 cup sugar (plus extra for the tops)
- 1 to 2 teaspoons vanilla extract or vanilla bean paste
- Pinch of salt
- 4 ramekins (or small oven safe dishes)
- Deep baking dish for a water bath
- Kettle or saucepan of hot water
- Kitchen torch or broiler
Instructions
- Pour the cream into a saucepan and warm it over medium heat until it is hot and steamy, but not boiling.
- Whisk egg yolks with sugar and salt until it looks smoother and a bit lighter.
- Combine slowly by drizzling in a little hot cream at a time while whisking the yolk mixture.
- Strain the mixture through a fine mesh sieve into a measuring cup if desired.
- Place ramekins in a deep baking dish and pour the custard into the ramekins.
- Pour hot water into the baking dish until it comes about halfway up the sides of the ramekins.
- Bake around 30 to 40 minutes until the edges are set, but the center still has a little wobble.
- Cool the ramekins on the counter, then cover and chill for at least 4 hours.
- Sprinkle an even layer of sugar over each custard and torch it until it melts and turns deep golden.
Notes
Chill the custard fully before torching for the best results.
- Prep Time: 15 minutes
- Cook Time: 40 minutes
- Category: Dessert
- Method: Baking
- Cuisine: French