Chicken Katsu is one of those weeknight dinners that saves me when I am tired, hungry, and this close to ordering takeout. You know the feeling, you open the fridge, stare for a second, and suddenly everything looks like too much work. This is exactly when I pull out chicken cutlets and a couple pantry staples and make something that feels fun and crunchy. It is simple, it is filling, and it makes the whole kitchen smell amazing. Plus, it is the kind of meal that makes everyone wander in and ask, what are you making? 
Understanding the Key Concepts
Before we jump in, let us get on the same page about what makes this dish special. Chicken Katsu is basically a crispy breaded chicken cutlet, usually made with panko breadcrumbs. It is inspired by Japanese cooking, but it has totally earned a place in my regular rotation because it is easy and super satisfying.
The main idea is simple. You season chicken, coat it in flour, dip it in egg, then press it into panko. Then you fry it until it turns **golden and crunchy**. That is it. No fancy tricks required, but a couple details really matter if you want that restaurant style crunch.
Here are the key parts that make or break your katsu:
- Thin chicken cutlets: They cook fast and stay juicy.
- Panko breadcrumbs: This is where the crunch comes from.
- Hot oil: Not scary hot, just steady hot so the coating crisps up without soaking oil.
- Resting on a rack: It keeps the bottom from getting soggy.
I also like to think of Chicken Katsu as a choose your own adventure meal. Some nights I serve it with rice and shredded cabbage, other nights I slice it over a salad, and sometimes it becomes a sandwich situation. If you like quick chicken dinners in general, you might also enjoy this 15-minute rotisserie chicken salad for a totally different vibe that still feels weeknight friendly.
Common Mistakes to Avoid
I have made every mistake possible with this recipe, usually when I am trying to rush. The good news is that once you know what to watch for, it is really easy to avoid sad, soggy breading.
Mistake 1: Using thick chicken
If your chicken is too thick, the breading gets dark before the inside cooks. I either buy cutlets or slice one breast in half horizontally. If I am feeling a little dramatic, I pound it lightly so it is even.
Mistake 2: Skipping seasoning
Season the chicken itself, not just the breadcrumbs. Salt and pepper on the meat makes a big difference. Sometimes I add garlic powder too.
Mistake 3: Pressing the crumbs too lightly
You want the panko to really stick. I press it on gently but firmly, like I mean it.
Mistake 4: Frying in oil that is not hot enough
If the oil is lukewarm, the coating absorbs oil and turns heavy. I test by dropping in one panko crumb. If it sizzles right away, we are good.
Mistake 5: Cutting right away
Let it rest for a couple minutes. If you slice immediately, juices run out and the crust steams.
“I tried this on a Tuesday when I was exhausted, and it still came out crispy like a restaurant. My picky kid asked for seconds, which never happens.”
Step-by-Step Guide to Implementation {video_youtube}
Okay, here is how I actually make it at home, without turning it into a big production. This is the part where you put on a playlist, pour a drink, and enjoy the process. Chicken Katsu is honestly relaxing once you get your little assembly line going.
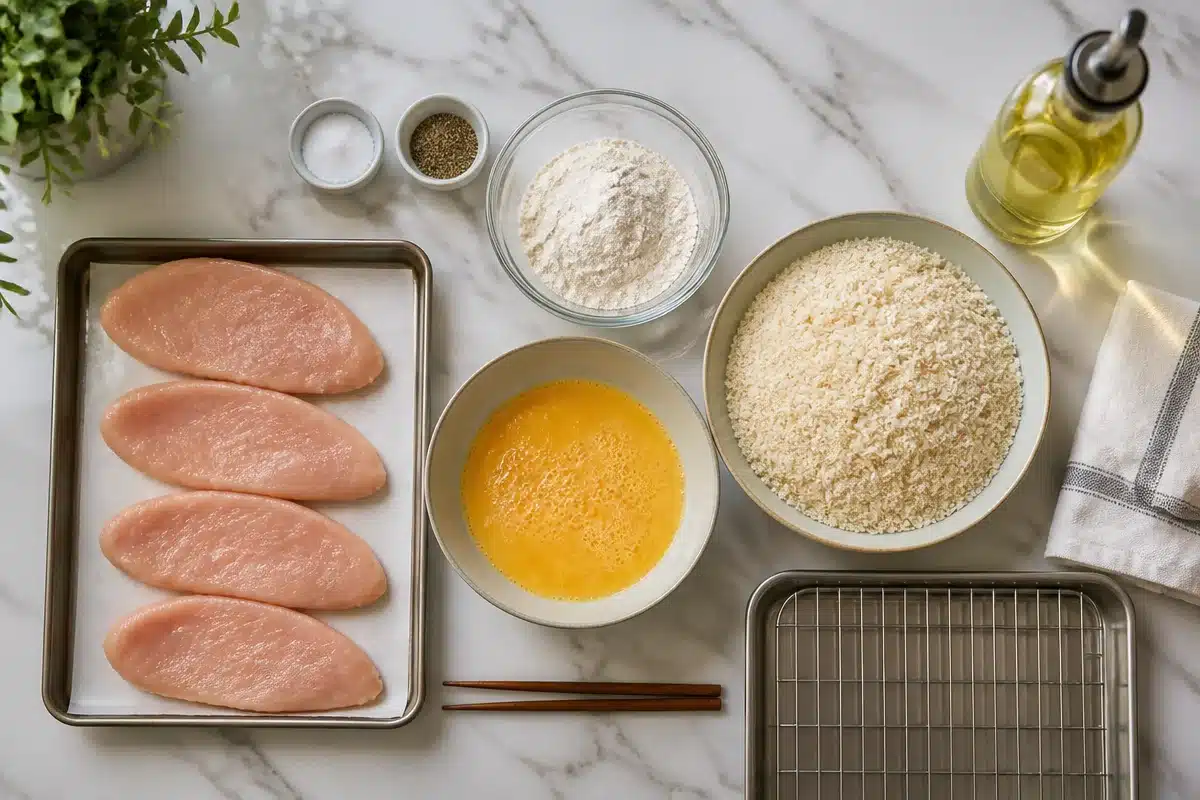
What you will need
- 2 to 4 chicken cutlets (or 2 large breasts sliced into cutlets)
- Salt and pepper
- About 1 half cup all purpose flour
- 2 eggs, beaten
- 1 to 2 cups panko breadcrumbs
- Neutral oil for frying (like canola or vegetable)
You can also add optional stuff like garlic powder, paprika, or a pinch of cayenne if you want a little kick. I keep it simple most nights.
How to cook it
1) Prep the chicken
Pat the chicken dry. Season both sides with salt and pepper. If the cutlets are uneven, pound them lightly so they cook evenly.
2) Set up your coating station
Put flour on one plate, beaten egg in a bowl, and panko on another plate. I like to season the panko with a pinch of salt too.
3) Coat in this order
Flour first, then egg, then panko. Press the panko in so it sticks well. Place the breaded cutlets on a plate while you heat the oil.
4) Heat the oil
Pour oil into a skillet so you have a shallow layer, roughly a quarter inch. Heat on medium to medium high. You want a steady sizzle, not smoke.
5) Fry
Carefully place the chicken in the oil. Do not crowd the pan. Fry about 3 to 4 minutes per side depending on thickness, until it is **deep golden** and cooked through.
6) Drain and rest
Move the cutlets to a wire rack or a plate with paper towels. Let them rest a couple minutes before slicing.
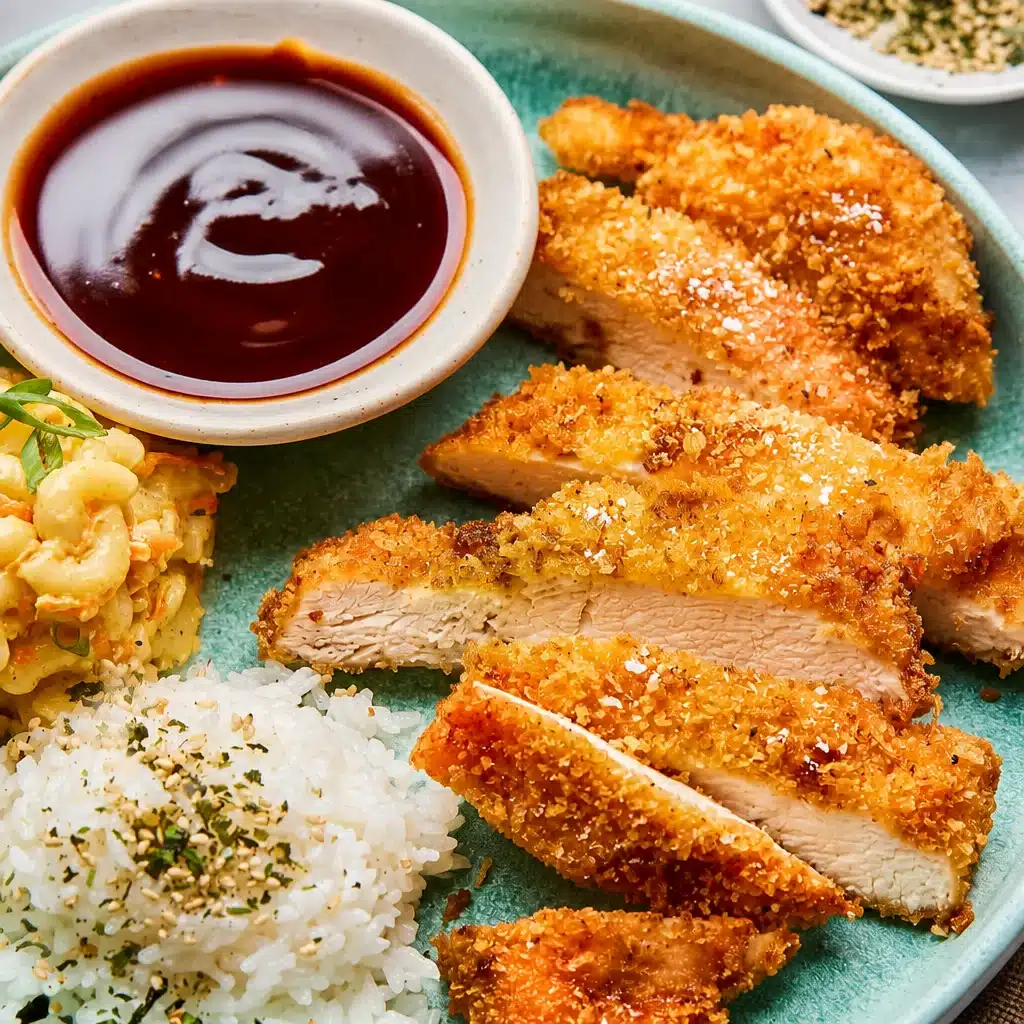
7) Slice and serve
Slice into strips and serve with rice, cabbage, a simple salad, or even tucked into a bun.
If you want a shortcut for sauce, bottled tonkatsu sauce is great, but I also love a quick mix of ketchup and a little Worcestershire with a pinch of sugar. Not traditional, but it hits the spot on a busy night.
And if you are on a chicken dinner streak, you might like this 15-minute keto chicken parmesan too. Different flavor, same weeknight energy.
Tips for Success and Best Practices
This is the part I wish someone told me the first time I made Chicken Katsu. It is not hard, but these small habits make it come out crispy every single time.
Keep one hand dry and one hand wet
Use one hand for flour and panko, and the other for egg. It saves you from getting breaded fingers that feel like tiny gloves.
Do not rush the oil
If the oil is not ready, the coating gets greasy. If it is too hot, it browns too fast. Medium to medium high is usually perfect.
Use a rack if you can
A wire rack keeps the crust crisp. If you only have paper towels, that is fine, just do not stack the pieces.
Make it meal prep friendly
You can bread the cutlets a few hours early and keep them in the fridge on a tray. When dinner time hits, just fry.
Easy serving ideas
This is where Chicken Katsu shines, because it plays well with so many sides.
- Steamed rice plus shredded cabbage with a squeeze of lemon
- Katsu over noodles with a drizzle of mayo and chili sauce
- Sliced on top of a big green salad
- In a sandwich with pickles and a little sauce
Also, if you are cooking for kids or anyone who is picky, serve the sauce on the side. Crispy chicken with dip is basically a guaranteed win.
Resources for Further Learning
If you make this once and decide you want to go deeper, there are lots of ways to level up while still keeping it simple. You can try baking it, air frying it, or experimenting with different sauces. Some people love curry sauce with katsu, and I totally get why.
Here is a quick comparison that might help you decide how to cook it depending on your night:
My honest take is that shallow frying gives you the best crunch with the least effort. Air frying is great when you want less mess. Baking works, but it rarely gets the same crisp unless you really watch the heat and flip carefully.
If you are the kind of cook who learns best by seeing a few different versions, I recommend looking at a couple solid recipes and noticing what stays the same. It is usually the cutlet thickness, the panko, and the heat control.
Common Questions
Can I make Chicken Katsu in the air fryer?
Yes. Spray the breaded cutlets with cooking spray, air fry around 375 F, and flip halfway. It will not taste exactly like frying, but it is still crunchy and good.
How do I keep the coating from falling off?
Pat the chicken dry first, do the flour then egg then panko order, and press the panko in well. Also, do not move the chicken around too much while it is frying.
What oil is best for frying?
Use a neutral oil like canola, vegetable, or peanut oil. Olive oil is not my favorite here because the flavor can be a little strong.
Can I reheat leftovers and keep them crispy?
Reheat in the oven or air fryer. Microwaving makes it soft. I do 375 F for about 8 to 10 minutes, depending on thickness.
What sauce goes with it if I cannot find tonkatsu sauce?
Mix ketchup with a little Worcestershire sauce and a tiny pinch of sugar. It is a quick weeknight stand in that still tastes great.
A crunchy dinner you will actually want to repeat
Chicken Katsu is one of those meals that feels like a treat, but it is totally doable on a regular weeknight. Once you get the breading and frying rhythm down, it becomes fast, comforting, and honestly kind of fun to make. If you want to compare methods or see other small twists, I like checking guides like Mom’s 25-Minute Crispy Chicken Katsu (Japanese Chicken Cutlet) and this super detailed Chicken Katsu Recipe (Ultra Crispy!) – The Kitchn. Give it a try the next time you are tempted by takeout, and let the crunch do the convincing. You have got this.
Print
Chicken Katsu
- Total Time: 30 minutes
- Yield: 4 servings
- Diet: N/A
Description
A delicious and crunchy chicken cutlet breaded in panko, inspired by Japanese cuisine, perfect for weeknight dinners.
Ingredients
- 2 to 4 chicken cutlets (or 2 large breasts sliced into cutlets)
- Salt and pepper
- ½ cup all purpose flour
- 2 eggs, beaten
- 1 to 2 cups panko breadcrumbs
- Neutral oil for frying (like canola or vegetable)
- Optional: garlic powder, paprika, or a pinch of cayenne
Instructions
- Prep the chicken: Pat the chicken dry and season both sides with salt and pepper.
- Set up your coating station: Prepare a plate with flour, a bowl with beaten eggs, and another plate with panko breadcrumbs.
- Coat in this order: Flour first, then egg, then panko, pressing the panko on well.
- Heat the oil: Pour enough oil into a skillet for a shallow layer and heat over medium to medium-high.
- Fry: Carefully place the chicken in the oil and fry for about 3 to 4 minutes per side until deep golden and cooked through.
- Drain and rest: Move the cutlets to a wire rack or paper towel and let them rest for a couple of minutes.
- Slice and serve: Slice the cutlets and serve with rice, cabbage, salad or in a sandwich.
Notes
To keep the crust crispy, rest the cooked cutlets on a wire rack. Pair with tonkatsu sauce or a ketchup-worcestershire mix.
- Prep Time: 15 minutes
- Cook Time: 15 minutes
- Category: Main Course
- Method: Frying
- Cuisine: Japanese