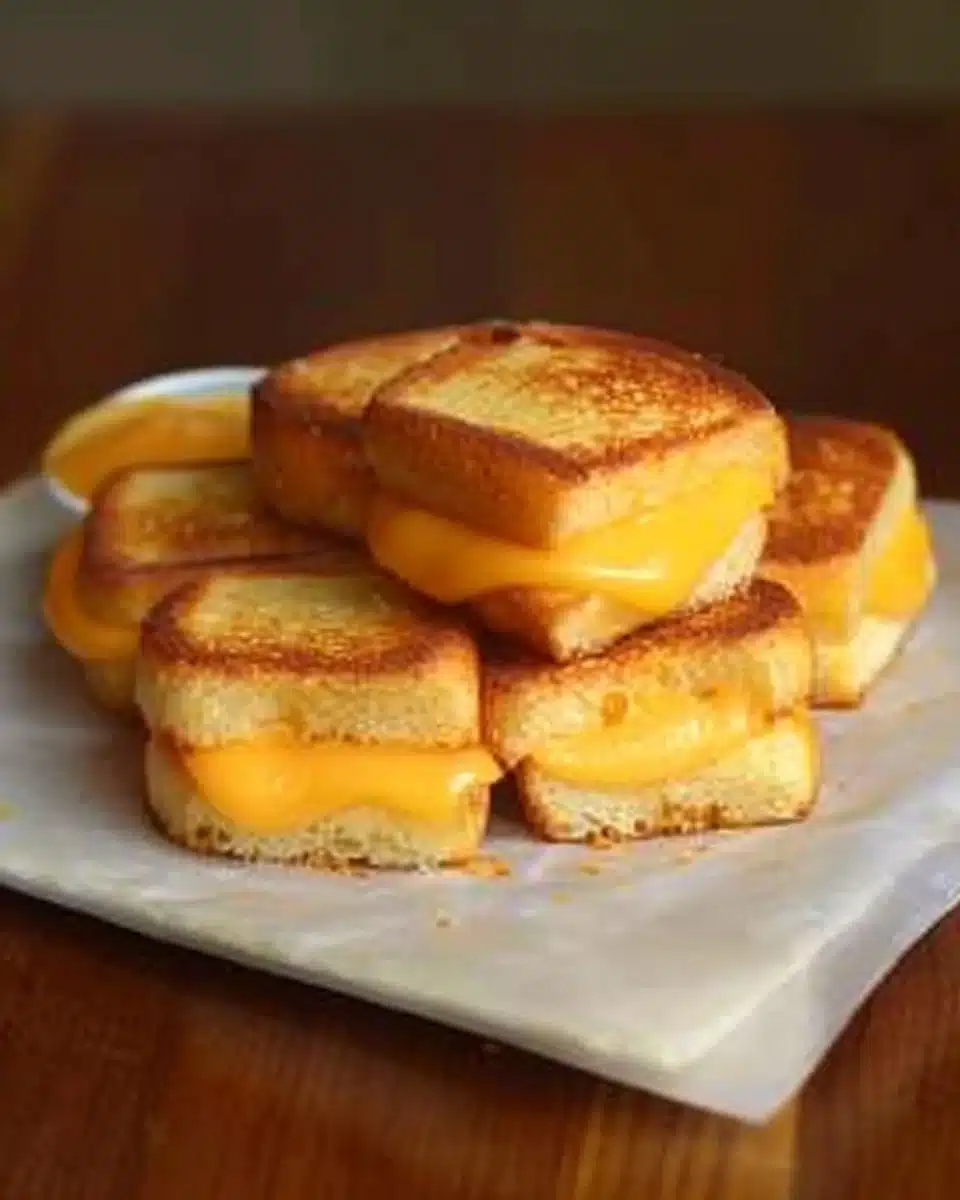
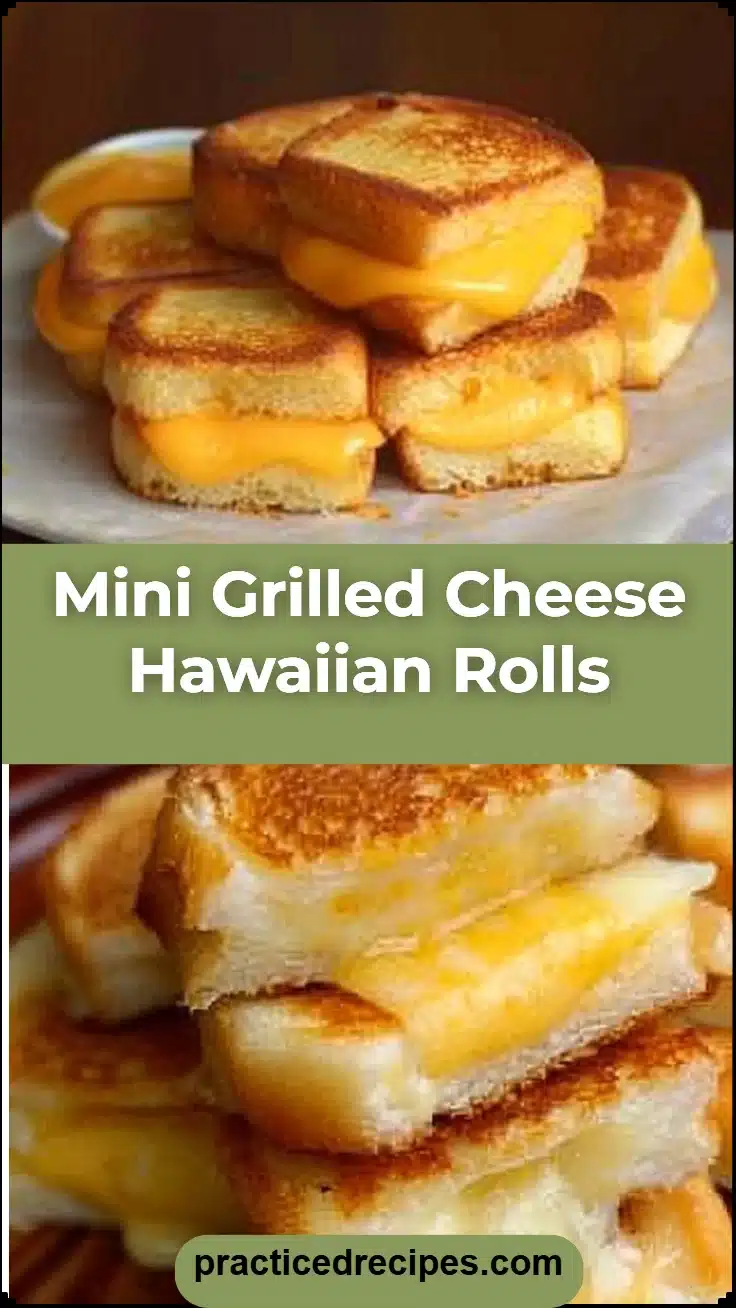
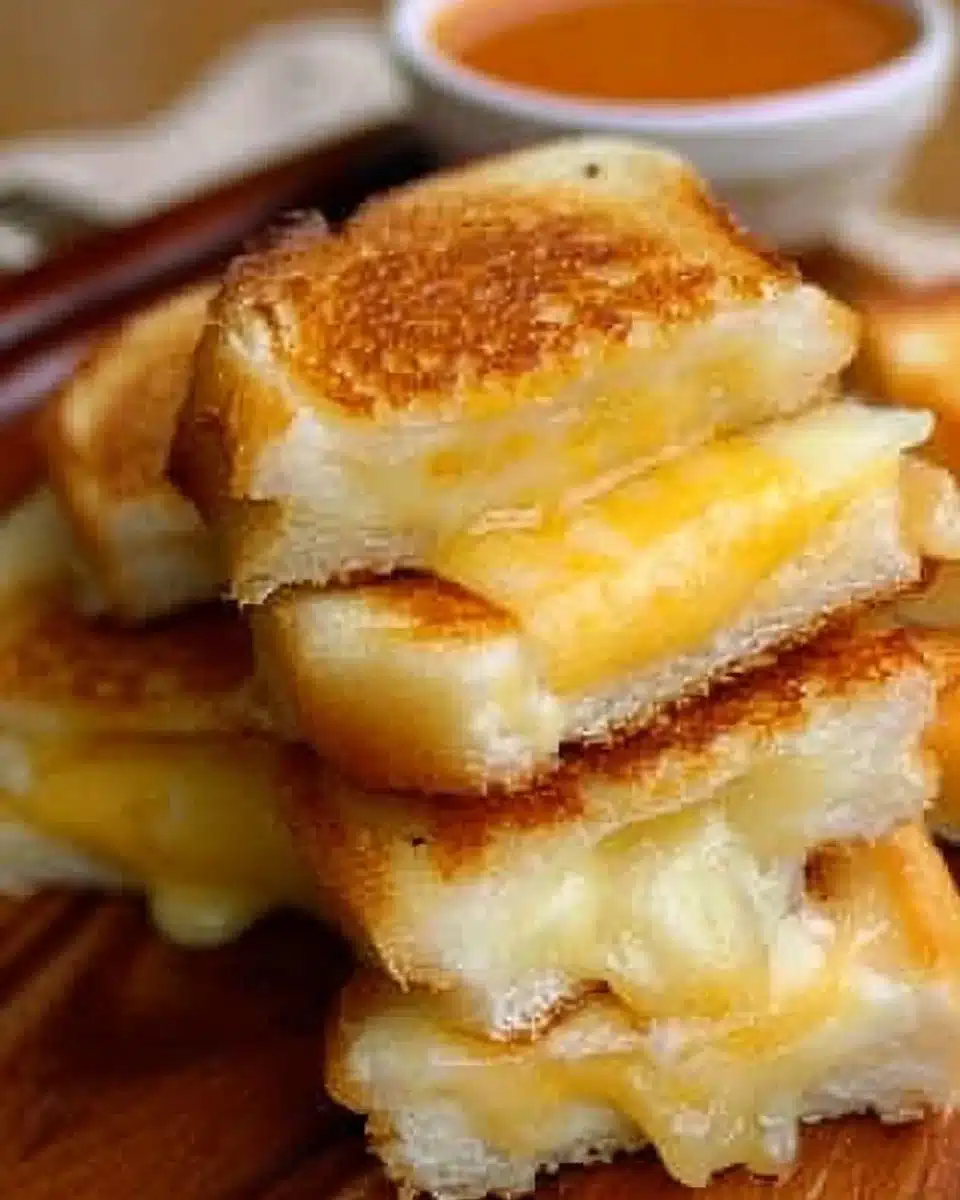
Mini Grilled Cheese Hawaiian Rolls are the kind of snack that brings people together—easy to make, irresistibly gooey, and perfectly sized for parties, game day, or an indulgent weeknight comfort bite. These little sliders combine soft, slightly sweet Hawaiian rolls with melted cheddar and a buttery, garlicky topping that toasts up golden in the oven. They’re quick, crowd-pleasing, and endlessly adaptable.
**
introduction: Include the keyword in the first sentence
why make this recipe
how to make Mini Grilled Cheese Hawaiian Rolls
Ingredients :
1 pack Hawaiian rolls (12-count), 8–10 cheddar cheese slices or preferred cheese, 4 tbsp melted butter, 1/2 tsp garlic powder, 1/2 tsp onion powder, 4 slices turkey bacon, beef bacon, or chicken bacon (optional), 1 tsp dried parsley, Pinch of salt and pepper
Directions :
Preheat your oven to 350°F., Slice the entire sheet of Hawaiian rolls horizontally without separating them., Lay cheese slices evenly on the bottom half., Add turkey bacon, beef bacon, or chicken bacon if using., Place the top half of the rolls back on., Mix melted butter with garlic powder, onion powder, parsley, salt, and pepper., Brush the butter mixture across the tops of the rolls., Cover with foil and bake for 12 minutes., Remove foil and bake another 5–7 minutes until golden., Slice and serve warm.
Pro Tips for Success Mini Grilled Cheese Hawaiian Rolls (4–6 items)
Flavor Variations Mini Grilled Cheese Hawaiian Rolls (3–5 ideas)
Serving Suggestions Mini Grilled Cheese Hawaiian Rolls
Storage and Freezing Instructions Mini Grilled Cheese Hawaiian Rolls
Nutrition Facts (Per Serving) — (calories, protein, carbs, fat, fiber, sodium)
FAQ About Mini Grilled Cheese Hawaiian Rolls — each question in H3, each answer 3–6 sentences and detailed
**
Why make this recipe
Mini Grilled Cheese Hawaiian Rolls are quick, satisfying, and flexible. They take only a few minutes to assemble and bake, which makes them ideal for last-minute guests, after-school snacks, or a small, cozy meal. The sweet softness of Hawaiian rolls pairs beautifully with sharp cheddar and a savory butter topping, creating a balance of flavors and textures in every bite.
They’re also a low-effort way to serve something that feels special. You don’t need a grill or fancy equipment—just one baking sheet, foil, and a brush. If you want to feed a crowd, multiply the ingredients and bake multiple trays. They hold up well on a party platter and are especially popular with kids and adults alike.
Finally, this recipe is a great canvas for creativity. Swap cheeses, add fillings, or tailor the seasonings to match what you have on hand. That flexibility makes them a useful recipe to keep in your repertoire.
How to make Mini Grilled Cheese Hawaiian Rolls
This recipe is intentionally straightforward: slice, layer, butter, bake, and serve. Below is a clear, step-by-step approach with little extras to help you get perfect results every time.
- Preheat and prep. Preheat your oven to 350°F (175°C). Line a baking sheet with foil for easier cleanup, or use an oven-safe baking dish that fits the sheet of rolls snugly.
- Slice the rolls. Take the pack of 12 Hawaiian rolls and slice the entire sheet horizontally, keeping the rolls attached so you have one bottom half and one top half. Leaving the sheet intact makes assembly faster and ensures even baking.
- Add the cheese. Lay 8–10 slices of cheddar (or your preferred cheese) evenly on the bottom half. If your slices are larger than the sheet, you can overlap them slightly so every roll gets a good pull of cheese.
- Add optional bacon. If using turkey, beef, or chicken bacon (or a vegetarian substitute), place cooked slices over the cheese. Turkey bacon is a lean choice that still brings smoky flavor. Make sure the bacon is fully cooked before assembling—it won’t fully crisp in the oven when wrapped inside the roll.
- Reassemble the rolls. Place the top half of the rolls back on the cheese and bacon so you have a full loaf again.
- Make the butter glaze. In a small bowl, mix 4 tablespoons of melted butter with 1/2 teaspoon garlic powder, 1/2 teaspoon onion powder, 1 teaspoon dried parsley, and a pinch of salt and pepper. Stir until combined.
- Brush the top. Use a pastry brush or spoon to spread the butter mixture evenly across the tops of the rolls. This gives you a flavorful, golden crust.
- Cover and bake. Loosely cover the rolls with foil and bake for 12 minutes. Covering traps steam and helps the cheese melt evenly.
- Uncover and finish. Remove the foil and bake an additional 5–7 minutes, until the top is golden and slightly crisp.
- Slice and serve. Use a sharp knife to slice through the roll sheet between each roll or into desired serving pieces. Serve warm for the best melty texture.
Ingredients (with notes and substitutions)
- 1 pack Hawaiian rolls (12-count)
- Notes: Choose soft dinner rolls—King’s Hawaiian-style rolls are classic for this recipe. If rolls are very large, you can make fewer sliders or cut differently.
- 8–10 cheddar cheese slices or preferred cheese
- Notes: Sharp cheddar gives classic flavor and good melt. Swiss, provolone, pepper jack, or a blend work great. For a creamier bite, try a slice of havarti or gouda.
- 4 tbsp melted butter
- Notes: Unsalted butter lets you control salt; use salted if you prefer and reduce added salt.
- 1/2 tsp garlic powder
- 1/2 tsp onion powder
- 4 slices turkey bacon, beef bacon, or chicken bacon (optional)
- Notes: If you avoid pork, turkey, beef, or chicken bacon are listed here. Vegetarian options include smoked mushrooms, tempeh bacon, marinated tofu, or plant-based bacon strips.
- 1 tsp dried parsley
- Pinch of salt and pepper
Ingredient notes and substitutions:
- Dairy-free: Use dairy-free butter and a plant-based cheese slice that melts well.
- Vegetarian: Skip meat and add grilled mushrooms or caramelized onions for savory depth.
- Cheesy variations: Combine a slice of cheddar with a sprinkle of grated parmesan before baking for a nuttier top.
- Gluten-free: Use gluten-free slider rolls or cut small gluten-free buns in half.
Directions (expanded tips while following the original recipe steps)
- Preheat your oven to 350°F (175°C). A consistent oven temperature is key for even melting and browning.
- Slice the entire sheet of Hawaiian rolls horizontally without separating them. Keeping the top and bottom connected makes it easier to layer and ensures the rolls don’t slide apart in the oven.
- Lay cheese slices evenly on the bottom half. If your cheese doesn’t cover all spots, tear a small piece to fill gaps so every slider gets melted cheese.
- Add turkey bacon, beef bacon, or chicken bacon if using. If using bacon, cook it until it’s mostly crisp before adding so it’s pleasantly crunchy in the finished slider.
- Place the top half of the rolls back on. Make sure the top lines up with the bottom so you can slice cleanly after baking.
- Mix melted butter with garlic powder, onion powder, parsley, salt, and pepper. Taste the butter to check seasoning—remember the cheese will add salt too.
- Brush the butter mixture across the tops of the rolls. Get into the nooks and crannies for even flavor.
- Cover with foil and bake for 12 minutes. The foil helps the cheese melt without over-browning the buttered top.
- Remove foil and bake another 5–7 minutes until golden. Keep a close eye in the last few minutes to prevent burning—browned and fragrant is perfect.
- Slice and serve warm. For clean slices, use a serrated knife or a long chef’s knife in a single, gentle sawing motion.
Pro Tips for Success Mini Grilled Cheese Hawaiian Rolls
- Use cold butter for mixing then melt it gently. Overheated butter can sometimes separate; melt low and stir until smooth for an even glaze.
- Pre-cook garnishes. If you want bacon, caramelized onions, or sautéed mushrooms, cook them fully first. They won’t fully cook inside the roll, and pre-cooking concentrates the flavor.
- Don’t skimp on the foil step. Covering the rolls during the first bake traps steam that helps cheese melt evenly; uncovering at the end gives that golden, toasted top.
- Single-layer cheese works best. Thin, full slices melt fastest and create that classic gooey pull. If you only have shredded cheese, press it down evenly across the bottoms so it melts into a uniform layer.
- Let rest briefly after baking. A 2-minute rest helps the cheese firm up just enough to slice cleanly without being too liquid.
Flavor Variations Mini Grilled Cheese Hawaiian Rolls
- Hawaiian-Italian: Replace cheddar with provolone, add a thin slice of salami or smoked turkey, and brush with a pesto-butter mix for a fragrant twist.
- Spicy pepper-jack and jalapeño: Use pepper jack cheese, add thinly sliced pickled jalapeños between the cheese, and substitute smoked paprika for some of the garlic powder.
- BBQ bacon cheddar: Mix a teaspoon of your favorite BBQ sauce into the butter glaze, use smoked cheddar if available, and layer in pre-cooked turkey bacon for smoky-sweet flavor.
- Veggie melt: Skip meat entirely and add a layer of sautéed mushrooms, spinach, or roasted red peppers beneath the cheese for a savory vegetarian option.
- Sweet & savory Hawaiian: Add a thin slice of ham substitute (or smoked chicken), a small apple slice or pear sliver, and use a milder cheddar for a harmonious sweet-savory slider.
Serving Suggestions Mini Grilled Cheese Hawaiian Rolls
These sliders are versatile and can fit into many menus:
- Party platter: Arrange on a platter garnished with fresh parsley, and serve with dipping sauces—ranch, honey mustard, or marinara.
- Comfort meal: Pair with a warm bowl of tomato soup or a simple vegetable soup for a classic grilled cheese experience.
- Brunch table: Serve alongside fresh fruit, mixed greens, and deviled eggs for a weekend brunch spread.
- Picnic or potluck: Allow the sliders to cool slightly, wrap them individually, and they travel well to picnics or casual gatherings.
- Kid-friendly snack: Slice into individual sliders and serve with carrot sticks and a yogurt dip for a balanced snack box.
Storage and Freezing Instructions Mini Grilled Cheese Hawaiian Rolls
Storing:
- Short-term: Keep any leftover sliders in an airtight container in the refrigerator for up to 3 days. Reheat in a 325°F oven for 8–10 minutes covered with foil, then uncover for a few minutes to re-crisp the top.
- For quick reheating, microwave single sliders for 20–30 seconds to warm, then finish in a toaster oven or skillet to restore crispness.
Freezing:
- Freeze whole or in portions. Let the sliders cool completely, then wrap tightly in plastic wrap and aluminum foil, or place in a heavy-duty freezer bag. Freeze for up to 1 month for best quality.
- Reheating from frozen: Thaw overnight in the refrigerator. Reheat in the oven at 325°F for 12–15 minutes covered with foil, then remove the foil and bake another 5 minutes to refresh the top. If you’re short on time, reheat directly from frozen at 350°F for 20–25 minutes, checking that the center is hot and the cheese is melted.
Tips for maintaining texture:
- Avoid reheating repeatedly; each cycle dries breads and can make cheese grainy.
- Add a light brush of butter before reheating to restore moisture and flavor.
Nutrition Facts (Per Serving estimate)
These values are approximate and based on dividing the full recipe into 12 sliders (one roll each). Exact nutrition depends on brands and portion sizes.
- Calories: 180 per slider
- Protein: 8 g
- Carbohydrates: 18 g
- Fat: 11 g
- Fiber: 1 g
- Sodium: 350 mg
Notes on nutrition:
- Using lighter cheese, reduced-fat butter, or skipping bacon will lower calories and fat.
- Swapping to whole-grain or higher-fiber rolls will increase fiber and slightly change carb counts.
- If sodium is a concern, use low-sodium cheese and rolls labeled low sodium.
FAQ About Mini Grilled Cheese Hawaiian Rolls
Can I make these ahead of time?
Yes. Assemble the sliders up to the point of baking, then cover tightly and refrigerate for up to a day before baking. When ready, bake them straight from the fridge, but add a few extra minutes to the covered baking time to ensure the cheese melts fully. For parties, this strategy saves time and reduces last-minute prep.
What cheeses work best for melting?
Cheeses that melt smoothly—sharp cheddar, American, provolone, havarti, and monterey jack—are excellent choices. A combo of cheeses can also add complexity: for example, cheddar for flavor plus provolone for creaminess. Avoid aged cheeses that don’t melt well on their own without blending.
Can I make these dairy-free or vegan?
Absolutely. Use dairy-free butter for the glaze and a plant-based cheese slice that melts well. Some vegan cheeses respond better when grated and pressed into a uniform layer rather than sliced. Choose a sturdy vegan roll or one labeled dairy-free. Keep in mind textures vary, so test your preferred vegan cheese beforehand.
How do I keep the sliders from getting soggy?
Sogginess often comes from excess moisture in fillings. To avoid it: make sure additions like tomatoes, sautéed vegetables, or wet condiments are drained well and added sparingly. Cooked fillings should be cooled slightly and patted dry. Brushing butter across the top instead of saturating the roll interior also helps maintain a pleasant texture.
Can I grill these instead of baking?
Yes—the concept translates nicely to a grill or stovetop griddle if you assemble individual sliders rather than a full sheet. Place each assembled slider on a medium-low preheated skillet or griddle, cover with a lid to trap heat, and cook 3–4 minutes per side until cheese melts and bread is toasted. For a whole-sheet version, a large covered grill with indirect heat can work, but watch closely to prevent burning.
Are there good dipping sauces to serve with these?
These sliders pair beautifully with savory, tangy, or sweet dips. Marinara or tomato soup are classic grilled cheese pairings. For a modern twist, try honey mustard, sriracha mayo, ranch, or a smoky barbecue sauce. Offer a few options to let guests tailor their bites.
How can I make these more substantial for a meal?
Serve them with a hearty soup, a green salad topped with nuts and dried fruit, or roasted vegetables on the side. You can also bulk up each slider with protein—add a thin slice of roasted chicken, turkey, or an extra hearty vegetable topping like caramelized onions and mushrooms.
Can I use frozen rolls?
If using previously frozen rolls, thaw completely and pat dry before assembling. Slightly stale rolls can be refreshed with a quick brush of butter before baking, which compensates for dryness and produces a crisp, golden top.
Final Thoughts
Mini Grilled Cheese Hawaiian Rolls are a simple, satisfying comfort food that’s easy to personalize. Whether you keep them classic with cheddar or experiment with new fillings and cheeses, they bring warm, cheesy comfort to any table. They work for parties, weeknight dinners, and everything in between—quick to make, easy to adapt, and always a crowd-pleaser.
If you’re looking for a dependable, cozy snack or party food that comes together in minutes and can be scaled up with minimal fuss, these sliders are worth keeping in your weeknight lineup.
Print
Mini Grilled Cheese Hawaiian Rolls
- Total Time: 30 minutes
- Yield: 12 servings
- Diet: Vegetarian
Description
Mini Grilled Cheese Hawaiian Rolls are easy to make, irresistibly gooey, and perfect for parties or weeknight comfort bites.
Ingredients
- 1 pack Hawaiian rolls (12-count)
- 8–10 cheddar cheese slices or preferred cheese
- 4 tbsp melted butter
- 1/2 tsp garlic powder
- 1/2 tsp onion powder
- 4 slices turkey bacon, beef bacon, or chicken bacon (optional)
- 1 tsp dried parsley
- Pinch of salt and pepper
Instructions
- Preheat your oven to 350°F (175°C).
- Slice the entire sheet of Hawaiian rolls horizontally without separating them.
- Lay cheese slices evenly on the bottom half.
- Add turkey bacon, beef bacon, or chicken bacon if using.
- Place the top half of the rolls back on.
- Mix melted butter with garlic powder, onion powder, parsley, salt, and pepper.
- Brush the butter mixture across the tops of the rolls.
- Cover with foil and bake for 12 minutes.
- Remove foil and bake another 5–7 minutes until golden.
- Slice and serve warm.
Notes
For added flavor, experiment with different cheeses and toppings.
- Prep Time: 10 minutes
- Cook Time: 20 minutes
- Category: Snack
- Method: Baking
- Cuisine: American