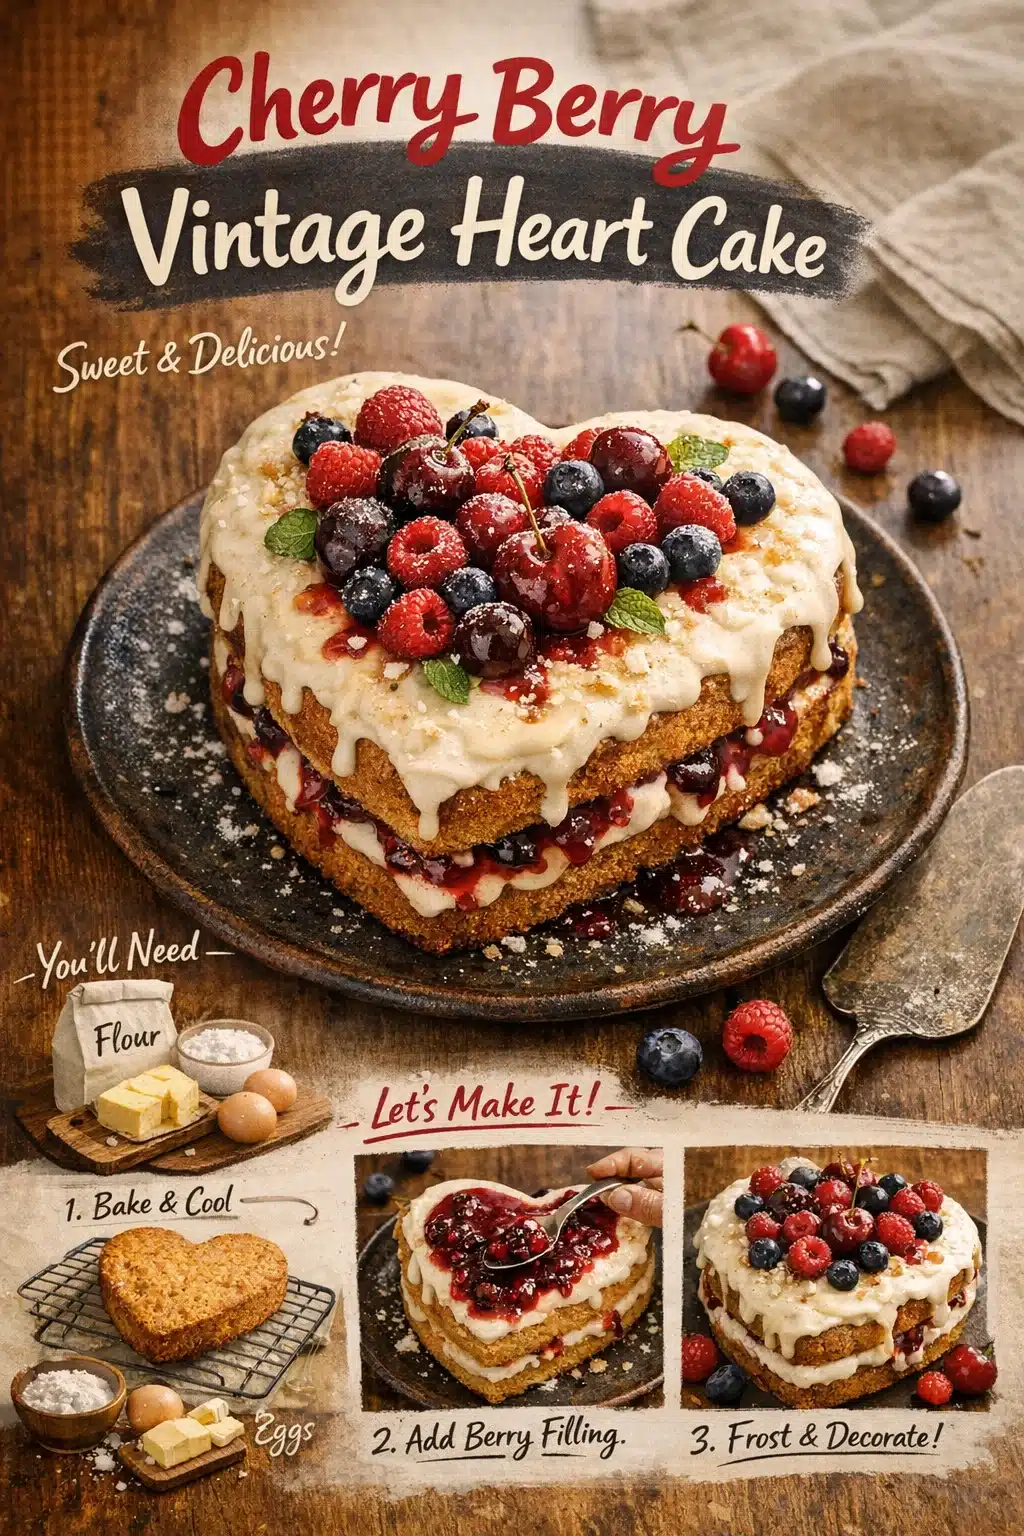
Cherry Berry Vintage Heart Cake
A Cherry Berry Vintage Heart Cake is an enchanting dessert that blends the sweet and tart flavors of fresh cherries and mixed berries with a soft, moist cake. This delightful treat is perfect for special occasions or just because you want to make something special for your loved ones. Baking this heart-shaped cake allows you to express your feelings in a delicious and charming way. Here’s how to create your very own Cherry Berry Vintage Heart Cake!
Why Make This Recipe
Creating a Cherry Berry Vintage Heart Cake is a fantastic way to celebrate love, friendship, or simply the joy of baking. This cake is not only visually stunning but also brings together the delightful flavors of juicy cherries and mixed berries, making it a hit at any gathering. With its vintage charm and impressive presentation, it’s bound to be the centerpiece of any dessert table. Plus, the combination of the rich cake layers with the fruity filling and creamy frosting is sure to leave everyone asking for seconds!
How to Make Cherry Berry Vintage Heart Cake
Creating the Cherry Berry Vintage Heart Cake is an enjoyable process that involves making the cake layers, a luscious cherry berry filling, and a smooth cream frosting. Follow the steps below to bring this sweet treat to life.
Ingredients
Cake Layers
- 3 cups all-purpose flour
- 1 tablespoon baking powder
- ½ teaspoon salt
- 1 cup unsalted butter, room temperature
- 2¼ cups granulated sugar
- 4 large eggs, room temperature
- 2 teaspoons vanilla extract
- 1 cup sour cream
- ½ cup whole milk
- Red gel food coloring (optional)
Cherry Berry Filling
- 1 cup cherries, pitted (fresh or frozen)
- 1 cup mixed berries (strawberries, blueberries, raspberries)
- ¼ cup granulated sugar
- 2 tablespoons lemon juice
- 1 tablespoon cornstarch + 2 tablespoons cold water
Smooth Cream Frosting
- 4 cups powdered sugar
- 1½ cups unsalted butter, room temperature
- 1 teaspoon vanilla extract
- 3–4 tablespoons heavy cream
Decoration
- White royal icing
- Heart cake stencil or pans
- Fresh berries (optional)
Directions
Preheat the oven to 350°F (175°C). Grease and line two heart-shaped cake pans.
In a mixing bowl, whisk together the flour, baking powder, and salt. Set aside for later use.
In another bowl, cream the butter until it’s soft and fluffy. Gradually add the sugar, beating until the mixture is light and airy.
Add the eggs one at a time, mixing well after each addition. Stir in the vanilla extract to incorporate it into the batter.
Start adding the dry mixture alternately with the sour cream and milk. Begin and end with the dry ingredients. Mix just until combined, making sure not to over-mix.
If you’d like to add a pop of color, incorporate red gel food coloring to achieve your desired shade. Divide the batter evenly between the prepared cake pans and bake for 25-30 minutes. Allow the cakes to cool completely once baked.
While the cake layers are cooling, prepare the cherry berry filling. Combine pitted cherries, mixed berries, sugar, and lemon juice in a saucepan. Stir in a cornstarch slurry made from cornstarch mixed with cold water. Simmer the mixture until it thickens and becomes glossy. Let it cool completely.
For the frosting, beat the softened butter until creamy. Gradually add the powdered sugar, mixing until combined. Stir in the vanilla and heavy cream. Beat until the frosting is smooth and fluffy.
Assemble the cake by layering the first cake layer with a generous portion of the berry filling. Place the second layer on top and apply a crumb coat around the entire cake. Chill in the refrigerator for 15 minutes to set the crumb coat.
Frost the cake with the smooth cream frosting and pipe vintage designs using white royal icing. For added flair, garnish with fresh berries if desired.

Pro Tips for Success Cherry Berry Vintage Heart Cake
Room Temperature Ingredients: Ensure that your butter, eggs, and sour cream are at room temperature for a smoother batter and better incorporation of ingredients.
Do Not Overmix: When combining dry ingredients with wet ones, mix just until you no longer see any dry flour. Overmixing can lead to a dense cake.
Cool Completely: Let the cake layers cool thoroughly before stacking and frosting to avoid melting the frosting or compromising stability.
Consistency of Filling: Ensure the filling is thick enough to stay in place; if it’s too runny, it may ooze out when you slice the cake.
Piping Techniques: For a vintage style, use various piping tips to create intricate designs with royal icing on top of the cake.
Flavor Boosts: Add a splash of almond extract to the cake batter for an extra layer of flavor.
Flavor Variations Cherry Berry Vintage Heart Cake
Mixed Citrus: Replace the lemon juice in the filling with orange or lime juice for a citrus twist that brightens the flavor.
Chocolate Layer: Add a layer of chocolate ganache in between the cake layers along with the berry filling for a decadent option.
Nutty Addition: Incorporate ground almonds or chopped walnuts into the cake batter for added texture and flavor.
Dairy-Free Substitute: Use coconut cream instead of heavy cream for frosting, and substitute non-dairy milk in the cake batter.
Spiced Flavor: Add a teaspoon of cinnamon or nutmeg to the dry ingredients for an aromatic, spicy hint.
Serving Suggestions Cherry Berry Vintage Heart Cake
The Cherry Berry Vintage Heart Cake is perfect for a variety of occasions. Serve it at birthday parties, wedding anniversaries, or even as a charming dessert for a holiday gathering. Slice it into heart-shaped pieces for an extra special presentation. Pair it with a scoop of vanilla ice cream or a dollop of whipped cream to add a creamy richness that complements the tart berry flavors.
Storage and Freezing Instructions Cherry Berry Vintage Heart Cake
To store your Cherry Berry Vintage Heart Cake, keep it in an airtight container in the refrigerator. It should last for about 3-5 days. If you want to make it ahead of time, you can freeze the cake layers wrapped tightly in plastic wrap and foil for up to 3 months. Thaw them in the refrigerator overnight before assembling the cake.
Nutrition Facts (Per Serving)
| Nutritional Component | Amount |
|—————————|———|
| Calories | 420 |
| Protein | 4g |
| Carbohydrates | 58g |
| Fat | 20g |
| Fiber | 1g |
| Sodium | 200mg |
FAQ About Cherry Berry Vintage Heart Cake
Can I use frozen berries for the filling?
Yes, you can use frozen berries instead of fresh ones. Just be sure to thaw and drain any excess water from the frozen berries to prevent the filling from becoming too watery.
How can I make the cake gluten-free?
To make the Cherry Berry Vintage Heart Cake gluten-free, substitute the all-purpose flour with a gluten-free all-purpose blend. Make sure that all other ingredients are also gluten-free.
How can I make the frosting less sweet?
If you find the frosting too sweet, you can add a pinch of salt or some lemon juice to balance the flavor. Additionally, use less powdered sugar if desired and increase the heavy cream to achieve a smooth consistency.
Is it possible to decorate the cake in advance?
Yes, you can decorate the cake a day in advance. Just be sure to store it in an airtight container in the refrigerator to keep it fresh.
Can I make this cake in different shapes?
Absolutely! While this recipe is designed for heart-shaped cake pans, you can use regular round pans or any other shapes you prefer. Just adjust the baking time accordingly, depending on the size and shape of the pans.
Final Thoughts
Baking a Cherry Berry Vintage Heart Cake is not only a delightful way to indulge in sweetness, but it’s also a wonderful opportunity to create cherished memories around the kitchen. With its beautiful presentation and harmonious flavors, this cake is bound to be a favorite among family and friends alike. So, gather your ingredients, roll up your sleeves, and enjoy the satisfying experience of creating this heartwarming dessert. Happy baking!
Print
Cherry Berry Vintage Heart Cake
- Total Time: 60 minutes
- Yield: 12 servings
- Diet: Vegetarian
Description
An enchanting dessert blending sweet and tart flavors of fresh cherries and mixed berries within a soft, moist heart-shaped cake.
Ingredients
- 3 cups all-purpose flour
- 1 tablespoon baking powder
- ½ teaspoon salt
- 1 cup unsalted butter, room temperature
- 2¼ cups granulated sugar
- 4 large eggs, room temperature
- 2 teaspoons vanilla extract
- 1 cup sour cream
- ½ cup whole milk
- Red gel food coloring (optional)
- 1 cup cherries, pitted (fresh or frozen)
- 1 cup mixed berries (strawberries, blueberries, raspberries)
- ¼ cup granulated sugar (for filling)
- 2 tablespoons lemon juice
- 1 tablespoon cornstarch + 2 tablespoons cold water
- 4 cups powdered sugar
- 1½ cups unsalted butter, room temperature (for frosting)
- 1 teaspoon vanilla extract (for frosting)
- 3–4 tablespoons heavy cream
- White royal icing (for decoration)
- Fresh berries (optional, for garnish)
Instructions
- Preheat the oven to 350°F (175°C). Grease and line two heart-shaped cake pans.
- In a mixing bowl, whisk together the flour, baking powder, and salt. Set aside.
- Cream the butter until soft and fluffy. Gradually add the sugar, beating until light and airy.
- Add the eggs one at a time, mixing well after each addition. Stir in the vanilla extract.
- Alternately add the dry mixture with the sour cream and milk, starting and ending with dry ingredients. Mix just until combined.
- If desired, add red gel food coloring to the batter. Divide the batter evenly between the prepared pans and bake for 25-30 minutes. Allow to cool.
- While cooling, prepare the cherry berry filling by combining cherries, mixed berries, sugar, and lemon juice. Stir in cornstarch mixed with cold water and simmer until thickened. Let it cool.
- For the frosting, beat the softened butter until creamy. Gradually mix in the powdered sugar, then add vanilla and heavy cream. Beat until smooth and fluffy.
- Assemble the cake by layering one cake with berry filling, adding the second layer on top. Apply a crumb coat and chill for 15 minutes.
- Frost the cake with the smooth cream frosting and decorate with royal icing and fresh berries if desired.
Notes
Ensure all ingredients, especially butter and eggs, are at room temperature for a smoother batter. Do not overmix and cool layers completely before stacking.
- Prep Time: 30 minutes
- Cook Time: 30 minutes
- Category: Dessert
- Method: Baking
- Cuisine: American